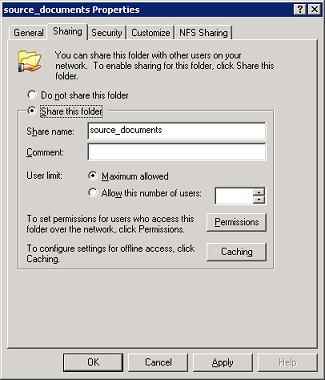
Sharing a folder in Windows Storage Server 2003 R2
To deploy the ArcGIS Data Appliance, you need to configure your ArcGIS Server system to use the cache directory on the appliance. After setting the appropriate permissions, you can then use the map documents on the appliance to create services that run on your ArcGIS Server. This document walks you through the necessary steps:
NOTE: See Requirements for a list of supported environments.
You need to share two folders on the ArcGIS Data Appliance so that your ArcGIS Server machines can access them. These are the cache and source_documents folders in the appliance's file structure. These folders store map and globe documents and their caches.
The ArcGIS Data Appliance runs the Windows Storage Server 2003 R2 operating system. The steps for sharing a folder using Windows Storage Server are the same as in other recent Windows operating systems. To share a folder on the ArcGIS Data Appliance:
Sharing a folder in Windows Storage Server 2003 R2
When you ran the ArcGIS Server post install, you specified a SOC account for your server to use when accessing data throughout the network. The SOC account needs to be accessible on the appliance and have permissions to any data or caches referenced by your services. How the SOC account gets its permissions depends on whether you're using a domain account or a local account (recommended) for the SOC account.
If you're in doubt or can't remember if your ArcGIS Server's SOC account is a local account or a domain account, you can do several things:
For security reasons, the ArcGIS Server documentation recommends using a local account for the SOC account. If you used a local account, you need to create an identical local SOC account on the ArcGIS Data Appliance. Follow these instructions to create the account:
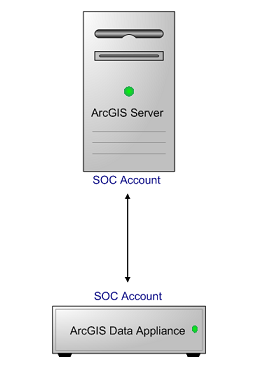
When using local accounts for the SOC account, you must create the SOC account on the ArcGIS Data Appliance.
Once you've created this local SOC account, you don't need to explicitly grant it permissions to any folders on the appliance. This is because Windows automatically adds the new account to the "Users" group, which has Read access to all of the necessary files on the appliance. Additionally, when you shared the cache and source_documents folders, the Windows "Everyone" group (which includes the SOC account) was granted Change (or Write) access to the shared folders. This is how your local SOC account gets permissions to access the shared folders.
If you change the Windows defaults to remove permissions for the Users or Everyone groups, you will need to explicitly grant the local SOC account both share and file (NTFS) permissions to the cache and source_documents folders.
If you designated a domain account as the SOC account, you will need to add it to the Windows "Users" group on the data appliance. Members of the Users group have Read access to all files on the appliance. To add the SOC account to the Users group, follow these steps:
When you shared the cache and source_documents folders on the device, the Windows "Everyone" group was granted Change (or Write) access to the shared folders. Thus, the SOC account gets its share permissions by virtue of belonging to the Everyone group, and its file (NTFS) permissions by being in the Users group.
If you change the Windows defaults to remove permissions for the Users or Everyone groups, you will need to explicitly grant the local SOC account both share and file permissions to the cache and source_documents folders.
NOTE: In the previous sections of this document, you worked with the ArcGIS Data Appliance. Now, you'll switch to configuring your GIS server. To complete the next step, you need to be able to access your Web server administration software and Manager.
ArcGIS Server maintains a list of directories in which it can find map and globe cache tiles. You need to explicitly add cache directories to this list. It's possible that you have a cache directory already in your existing ArcGIS Server deployment. Whether you do or not, you need to add a new cache directory that references the ArcGIS Data Appliance.
Click a link to view the steps for your configuration.
If you're using ArcGIS Server 9.3.1, skip to step 3B: Add the cache directory to your server. You don't need to complete step 3A.
If you're using ArcGIS Server 9.3, first you need to create a virtual directory. Then, you add the cache directory to your server.
A. Create a virtual directory that references the cache directory
If you're using ArcGIS Server 9.3, before you add the cache directory to your server, you need to create a virtual directory that will reference it. A virtual directory allows client applications to access the cache directory using a URL, which is often the fastest way to get the tiles.
You create a virtual directory on your Web server machine, using your Web server's administration software; however, the cache directory itself does not have to be on the same machine as the Web server. In this case, the virtual directory will reference the shared cache directory on the ArcGIS Data Appliance.
Instructions for creating a virtual directory in Internet Information Services (IIS) 6 are provided. Even if you are using a different Web server, you may find these instructions helpful when configuring your virtual directory.
A successfully created virtual directory that references the ArcGIS Data Appliance.
B. Add the cache directory to your server
Once you've given the SOC account permissions to access the cache folder if you're using ArcGIS Server 9.3, you're ready to add the cache directory to your server. To add a server cache directory, perform the following steps within ArcGIS Server Manager:
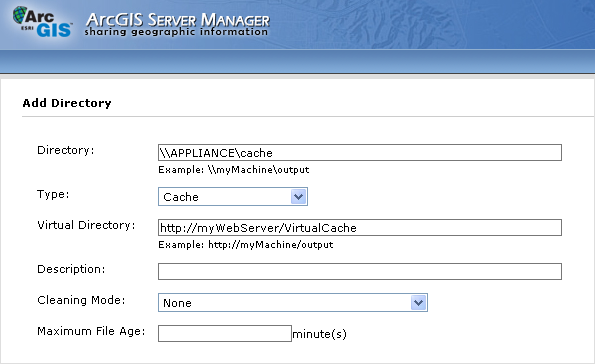
Specifying server cache directory properties in ArcGIS Server Manager 9.3.
NOTE: ArcGIS Server for the Microsoft .NET Framework deployments with REST applications must configure an IIS application pool to run using the ArcGIS Web Services user that was established/created during the ArcGIS Server post install. This is not necessary for ArcGIS Server for Java Platform installations using REST applications. To do this, see Create an application pool to improve system performance.
First you need to mount the shares you created, and for ArcGIS Server 9.3 you need to create a virtual directory in Apache. Then you add the cache directory to your server.
A. Mount the shares you just created
mount.cifs //esri_data/source_sm /media/SourceWorld -o user=demo_user,password=demo
mount.cifs //esri_data/cache_sm /arcgis/server/serverdir/arcgiscache/ -o user=demo_user,password=demo
B. Create a virtual directory in Apache
For ArcGIS Server 9.3.1, skip to step 3C: Add the cache directory to your server.
For ArcGIS Server 9.3, you need to create a virtual directory that will reference the directories on the ArcGIS Data Appliance. A virtual directory allows client applications to access the cache directory using a URL, which is often the fastest way to get the tiles.
Apache has a concept of virtual directories which maps a URL path to a location on disk. It is necessary to create a virtual directory to work with the cached content on the ArcGIS Data Appliance.
## Entry for the data appliance (Basemap Collection)
Alias /dataapp/cache_sm "//esri-da-01/cache_sm"C. Add the cache directory to your server
Once you've mounted the shares, and created the virtual directory if you're using ArcGIS Server 9.3, you're ready to add the cache directory to your server. To add a server cache directory, perform the following steps within ArcGIS Server Manager:
The most important step for deploying the ArcGIS Data Appliance is to create map services. These services will reference the caches and map documents on the appliance. You create these services the same way you create any other ArcGIS Server service.
Follow these instructions for each 2D map service that you want to create:
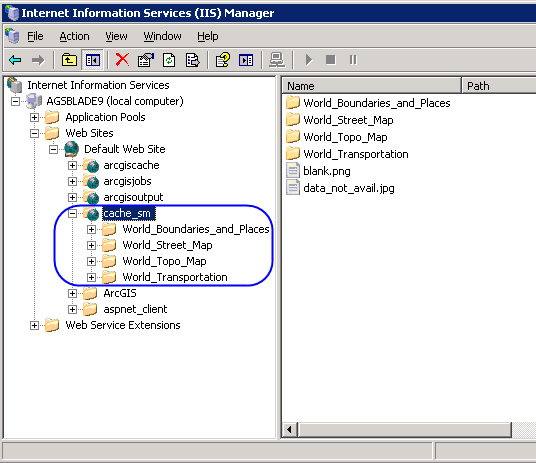
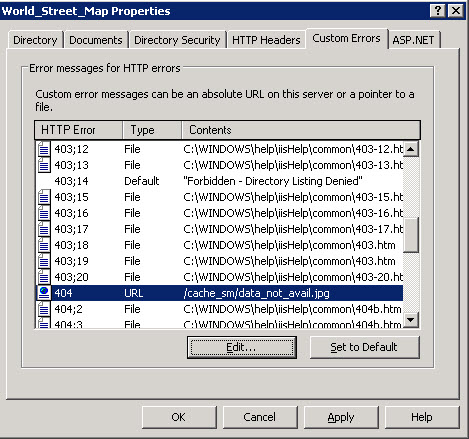
For ArcGIS Server 9.3 on Windows with IIS, you need to configure your Web server to return a "Data not available tile" for empty areas of your basemap services or a blank tile for empty areas of your reference overlay services. To display a tile, you need to create a custom error response in your virtual cache directory for HTTP Error 404: "Not Found". Instead of an error message, the Web server returns the tile. The blank.png and data_not_avail.jpg tiles are located on the ArcGIS Data Appliance in the cache folder.
• Use blank.png for reference overlay services, such as, transportation or boundaries and places.
• Use data_not_avail.jpg if you wish to perform these steps on 2D basemap services, such as, street maps, imagery, or topographic maps.
For ArcGIS Server 9.3.1, this step is not needed; the ArcGIS tile handler automatically returns a blank or no data tile for empty map areas.
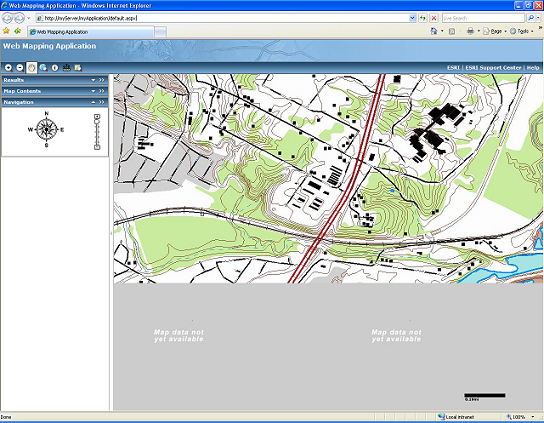
In the Web application above, the Web server was configured to return a gray tile with the message "Map data not yet available" in places where the cache has not been generated.
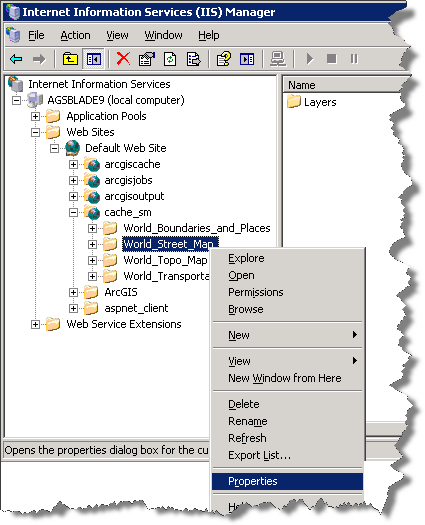
Following are steps for configuring Internet Information Services (IIS) 6.0 to return a "Data not available" tile. These steps are optional for basemap services, but you may find they improve the usability of the service.
For specific instructions on how to connect to your services and create basemaps from them, see the appropriate user guide for the ArcGIS application you are using: