Open topic with navigation
You are here: User guides > Using the ArcGIS Data Appliance with ArcGIS Desktop
Using the ArcGIS Data Appliance with ArcGIS Desktop
Connecting from ArcMap or ArcGlobe
Example: Creating a map that uses your own data with ArcGIS Data
Appliance services
Using the locators
Using the routing services
You can use services from the ArcGIS Data Appliance in ArcGIS Desktop applications to
support your GIS work. For example, you can add services to the maps and globes that you create in
ArcMap and ArcGlobe. From these maps and globes, you also have the option to prepare a published map
file (.pmf) that ArcReader users can access. Users of ArcReader will be able to view the services
within your published map or globe.
This document explains one way to add ArcGIS Data Appliance services to your maps and
globes, then gives an example of how to create a map that uses the services with your own data. It also includes a section on using the locators and routing services included on the ArcGIS Data Appliance with your maps; you can use these services only if you purchased the optional licenses for geocoding and/or routing.
NOTE: The availability of some basemaps and services
mentioned in this documentation may vary depending on the ArcGIS Data Appliance package that you
purchased.
Connecting from ArcMap or ArcGlobe
To add an ArcGIS Data Appliance service to an ArcMap document (.mxd) or ArcGlobe
document (.3dd), follow these steps:
- Open a new or existing map or globe document.
- Click the Add Data button
 .
.
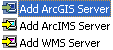
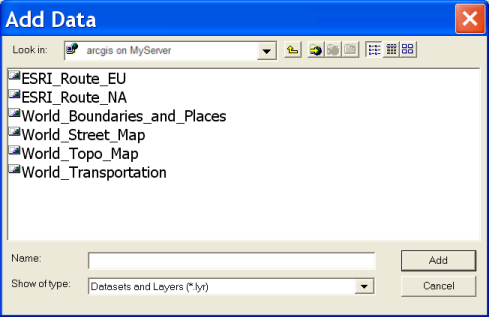
- In the Add Data dialog, double-click GIS Servers.

- Double-click Add ArcGIS Server. The Add ArcGIS Server wizard appears.
- Choose Use GIS Services, and click Next.
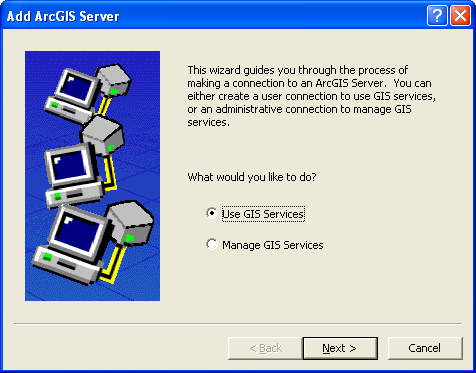
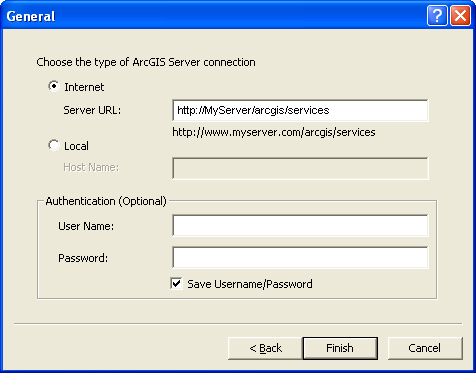
- Choose to create either a Local or an Internet connection, and click Finish.
- For an Internet connection, enter the URL of the server that is hosting the
ArcGIS Data Appliance services in the format: http:/<server>/<instance>/services. For
example, if you accepted the default instance name of "ArcGIS" when you installed ArcGIS Server, the
URL will look similar to this: http://myServer/ArcGIS/services. If the Web server requires
authentication, enter the user name and password, and check the box to save the user name and password.
- For a local connection, enter the name of the ArcGIS Server that is hosting the ArcGIS Data
Appliance services. Your account must be in the agsadmin or agsusers group on the server object
manager (SOM) machine of the GIS server.
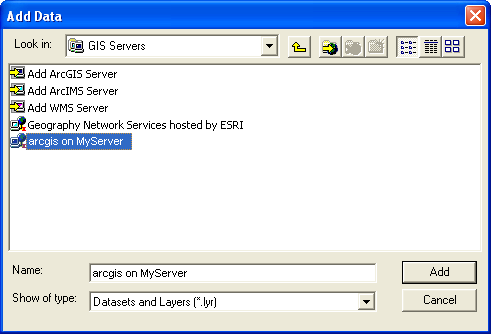
- In the list of GIS servers, you'll now see a connection to the GIS server that is
hosting the ArcGIS Data Appliance services.
- Double-click the server to see a list of available services.
NOTE: Map services can be used in both 2D and 3D applications.
NOTE: The routing services are available only on the ArcGIS Data Appliance with routing option.
- Select a service and click Add to add it to your map or globe, or you can use the
Ctrl key to add multiple services at once.
NOTE: You can also connect to the GIS server in ArcCatalog by
following steps 4–9 above. From ArcCatalog you can preview the services and drag and drop them into
ArcMap and ArcGlobe.
Example: Creating a map that uses your own data with ArcGIS Data Appliance services
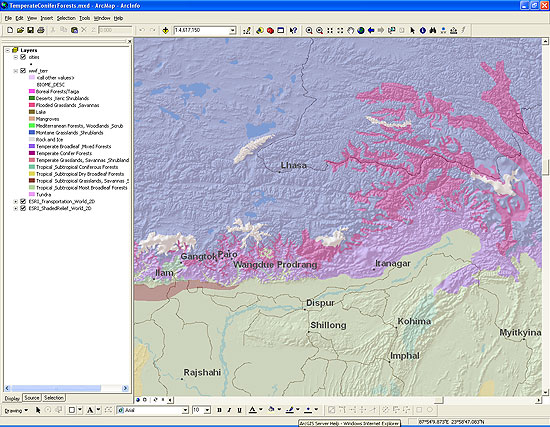
The ArcGIS Data Appliance contains services that can act as basemaps or supplemental maps
for your own data. A map that uses data from a server combined with data from one or more other
sources is called a mashup. The map below is an example of a mashup that you might create by combining
local environmental and city reference data with shaded relief and transportation services from the
ArcGIS Data Appliance.
Although this example uses 2D services, you can use similar techniques to combine your own
3D data with ArcGIS Data Appliance map services in ArcGlobe or ArcGIS Explorer.
How do you do that?
- In ArcMap, create a new document and follow the steps above to connect to the GIS
server hosting your ArcGIS Data Appliance services. Add the services of your choice. The example above
uses the services World_Shaded_Relief and World_Transportation.
- Add your own content to the map document. This example includes world cities and biomes.
- Set layer order, transparency, and symbology so that all layers play an appropriate
role in the map.
- Save the map and share it with others.
Sharing your map with others
There are a number of ways you can share the map you created in this example. The method
you choose will depend on how others can access your data and what software they have:
- If you want to share the map with others who have access to ArcMap and your data, you
can give them a copy of the map document (.mxd).
- If you want to share the map with others who do not have access to ArcMap, you can use
the Publisher extension to create a published map file (.pmf) that users can view with ArcReader.
These users will still need access to your data.
- If you want to share the map with others who don't have access to your data, you can
use an ArcGIS Server map service. In this scenario, you would perform the steps in the example slightly
differently:
- First, in ArcMap, create a new map document containing just your local data (not the ArcGIS
Data Appliance services) and publish it as an ArcGIS Server map service. For help with publishing the
map service, see the ArcGIS Server Help.
- Then, create a new map document and add your map service, as well as one or more ArcGIS Data
Appliance services. You can distribute this map document to others for use in ArcMap.
- Optionally, publish this map document as a published map file (.pmf) so that it can be viewed in
ArcReader. You need the Publisher extension to create a PMF file.
Using the Locators
There are two steps involved in using the locators included on the ArcGIS Data Appliance: adding the locator and using the locator. You can use these services only if you purchased the optional license for geocoding.
NOTE: The availability of some locators
mentioned in this documentation may vary depending on the ArcGIS Data Appliance package that you
purchased.
Adding a locator
To add an ArcGIS Data Appliance locator to an ArcMap document:
- Click the Tools menu, point to Geocoding, then click Address Locator Manager.
- Click Add in the Address Locator Manager dialog box.
- In the Look in drop-down menu, select GIS Servers, click Add ArcGIS Server to highlight it, and click Add.
- In the Add ArcGIS Server wizard, Select Use GIS Services and click Next.
- Create a connection to the server where the locators were deployed, and click Finish.
- In the list of GIS servers, you'll now see a connection to the GIS server that is
hosting the ArcGIS Data Appliance locators.
- Double-click the server to see a list of available adress locator services.
- Select the Locators folder and click Add.
- Select the locator you want to add to the ArcMap document and click Add, for example, TA_Address_NA.
- Click Close.
For additional information on adding locators in ArcMap, see Managing address locators in ArcMap under Geocoding and address management > Building an address locator in ArcGIS Desktop Help.
Using a locator
To use an ArcGIS Data Appliance locator in an ArcMap document:
- Click the Find tool
 in ArcMap, then click the Addresses tab.
- Choose the address locator you want to use from the list, for example, TA_Address_NA.
- Type the location in the text boxes and click Find, for example, for TA_Address_NA, you can find street address point, street address, ZIP Code, ZIP+4, and city/state in the U.S; or street address, street name, postal code, and city/province in Canada.

- The results display in the bottom of the dialog box. For details on the results for a query using TA_Address_NA, see the technical notes for the North American Address Locator; for TA_Address_EU, see the technical notes for the European Address Locator.
For additional information on adding locators in ArcMap, see Finding an individual address under Geocoding and address management > Locating addresses in ArcGIS Desktop Help.
Using the routing services
To find a route using an ArcGIS Data Appliance routing service, see Finding the best route under Extensions > Network Analyst > Performing network analysis in ArcGIS Desktop Help.
For details on Find route results, see the technical notes for the European Routing or North American Routing service.
NOTE: You can use the routing services only if you purchased the optional license for routing.