Open topic with navigation
You are here: Deployment > Deploying the ArcGIS Data Appliance (ArcGIS Server and Data)
Deploying the ArcGIS Data Appliance (ArcGIS Server and Data)
To deploy the ArcGIS Data Appliance, you need to configure your ArcGIS Server
system to use the cache directory on the appliance. After setting the appropriate
permissions, you can then use the map and globe documents on the appliance to create
services that run on your ArcGIS Server. This document walks you through the necessary
steps:
Step 1: Share the cache and source document locations on the appliance
Step 2: Give the SOC account permissions to access files on the appliance
Step 3: Configure ArcGIS Server to use the cache directory on the appliance
Step 4: Create the services
Step 5: Configure your Web server to return a blank tile for empty map areas
Step 6: Use the services
NOTE: See Requirements for a list of supported environments.
Step 1: Share the cache and source document locations on the appliance
You need to share two folders on the ArcGIS Data Appliance so that your ArcGIS
Server machines can access them. These are the cache and source_documents
folders in the appliance's file structure. These folders store map and globe
documents and their caches.
The ArcGIS Data Appliance runs the Windows Storage Server 2003 R2 operating
system. The steps for sharing a folder using Windows Storage Server are the same as in
other recent Windows operating systems. To share a folder on the ArcGIS Data Appliance:
- Browse to the source_documents folder using My Computer or Windows
Explorer.
- Right-click the folder name and click Properties.
- Click the Sharing tab, click "Share this folder," and click Permissions. Under Group or user names, make sure Everyone is highlighted. Under Permissions, for the Change (or Write) option, check Allow, and click OK. Then, click OK on the Properties dialog box.

Sharing a folder in Windows Storage Server 2003 R2
- Repeat steps 1–3 for the cache folder.
Step 2: Give the SOC account permissions to access files on the
appliance
When you ran the ArcGIS Server post install, you specified a SOC account for
your server to use when accessing data throughout the network. The SOC account needs to be
accessible on the appliance and have permissions to any data or caches referenced by your
services. How the SOC account gets its permissions depends on whether you're using a
domain account or a local account (recommended) for the SOC account.
If you're in doubt or can't remember if your ArcGIS Server's SOC account is a
local account or a domain account, you can do several things:
- Using Windows Computer Management, examine the local users on your computer.
If there's a user called ArcGISSOC, you probably accepted the defaults during the post
install and created a local SOC account.
- If you already have some services running on your server, check to see which
accounts have permissions to the source data. The SOC account will be in the list,
since it needs permissions for your services to run successfully.
- If you don't have any services running on your server, you can re-run the
ArcGIS Server Post Install to designate a new SOC account. You'll need to give this
account permissions to any data that you publish on your server.
Local SOC account
For security reasons, the ArcGIS Server documentation recommends using a local
account for the SOC account. If you used a local account, you need to create an identical
local SOC account on the ArcGIS Data Appliance. Follow these instructions to create the
account:
- From the ArcGIS Data Appliance, right-click My Computer, and click Manage.
- Expand Local Users and Groups, and click Users.
- Right-click the Users folder, and click New User.
- Enter the same user name and password that you used for the SOC account on
all other machines of your ArcGIS Server system. Upper and lower-case letters in the user
names and passwords must match.
- Uncheck "User must change password at next logon".
- Check "User cannot change password" and "Password never expires".
- Click OK.

When using local accounts for the SOC account,
you must create the SOC account on the ArcGIS Data Appliance.
Once you've created this local SOC account, you don't need to explicitly grant it
permissions to any folders on the appliance. This is because Windows automatically adds
the new account to the "Users" group, which has Read access to all of the necessary
files on the appliance. Additionally, when you shared the cache and
source_documents folders, the Windows "Everyone" group (which includes the SOC
account) was granted Change (or Write) access to the shared folders. This is how your local
SOC account gets permissions to access the shared folders.
If you change the Windows defaults to remove permissions for the Users or
Everyone groups, you will need to explicitly grant the local SOC account both share and
file (NTFS) permissions to the cache and source_documents folders.
Domain SOC account
If you designated a domain account as the SOC account, you will need to add it
to the Windows "Users" group on the data appliance. Members of the Users group have Read
access to all files on the appliance. To add the SOC account to the Users group, follow
these steps:
- From the appliance, right-click My Computer, and click Manage.
- Expand Local Users and Groups, then select Groups.
- In the list of groups on the right-hand side, double-click Users.
- Click Add, and add the domain account that your server uses for the SOC account.
- Click OK to dismiss the dialogs. Your SOC account will now be able to read the
caches and source documents on the appliance.
When you shared the cache and source_documents folders on the
device, the Windows "Everyone" group was granted Change (or Write) access to the shared folders. Thus, the SOC account gets its share permissions by virtue of belonging to
the Everyone group, and its file (NTFS) permissions by being in the Users group.
If you change the Windows defaults to remove permissions for the Users or
Everyone groups, you will need to explicitly grant the local SOC account both share and
file permissions to the cache and source_documents folders.
NOTE: In the previous sections of this document,
you worked with the ArcGIS Data Appliance. Now, you'll switch to configuring your GIS server.
To complete the next step, you need to be able to access your Web server administration
software and Manager.
Step 3: Configure ArcGIS Server to use the cache directory
on the appliance
ArcGIS Server maintains a list of directories in which it can find map and globe
cache tiles. You need to explicitly add cache directories to this list. It's
possible that you have a cache directory already in your existing ArcGIS Server deployment.
Whether you do or not, you need to add a new cache directory that references the ArcGIS
Data Appliance.
Click a link to view the steps for your configuration.
Windows with IIS
If you're using ArcGIS Server 9.3.1, skip to step 3C: Add the cache directory to your server. You don't need to complete steps 3A and 3B.
If you're using ArcGIS Server 9.3, first you need to create a virtual directory and configure IIS to work with
globe tiles. Then, you add the cache directory to your server.
A. Create a virtual directory that references the cache directory
If you're using ArcGIS Server 9.3, before you add the cache directory to your server, you need to create a virtual
directory that will reference it. A virtual directory allows client applications to access
the cache directory using a URL, which is often the fastest way to get the tiles.
You create a virtual directory on your Web server machine, using your Web
server's administration software; however, the cache directory itself does not have to be on
the same machine as the Web server. In this case, the virtual directory will reference the
shared cache directory on the ArcGIS Data Appliance.
Instructions for creating a virtual directory in Internet Information Services
(IIS) 6 are provided. Even if you are using a different Web server, you may find these
instructions helpful when configuring your virtual directory.
- Open IIS Manager by opening Control Panel > Administrative
Tools > Internet Information Services (IIS) Manager. (If you don't see the IIS Manager
shortcut, you may need to install IIS. To do this, navigate to Control Panel > Add or
Remove Components > Add/Remove Windows Components and check the Application Server
box.)
- Under your computer name, expand the Web Sites folder.
- Right-click Default Web Site and select New > Virtual Directory. You'll be
presented with a wizard that will help you create the virtual directory. Click Next to
dismiss the splash screen.
- Type an alias for the virtual directory (for example, "VirtualCache") and
click Next.
- Enter the UNC path to the shared cache folder on the ArcGIS Data
Appliance (for example, "\\APPLIANCE\cache"). Click Next.
- Since your virtual directory is referencing a shared location, a screen to
enter security credentials will display. The virtual directory should access the ArcGIS
Data Appliance using the SOC account.
- Uncheck "Always use the authenticated user's credentials when
validating access to the network directory".
- Fill in the user name and password boxes with the information for the
SOC account. If you are using local accounts for the SOC account, enter the name of the
local SOC account on the Web server machine (for example, "MYWEBSERVER\ArcGISSOC"). Or,
if you're using a domain account for the SOC account, enter the domain account name
(for example, "MYDOMAIN\ArcGISSOC").
- Click Next.
- Make sure the box to allow Read access is checked.
- Click Next to create the virtual directory, then click Finish to exit
the wizard. You should be able to expand your virtual directory and view the cache folders
as in the graphic below:

A successfully created virtual directory that references the
ArcGIS Data Appliance.
B. Configure IIS to work with globe (3d) tiles
IIS only serves files with extensions registered in the MIME types list. If you
will be serving globe (3D) services from the Data Appliance and are using ArcGIS Server 9.3, the following additional steps are
necessary to configure IIS 6.0 to work with the globe tiles in your virtual directory,
which do not have a file extension:
- In IIS Manager, right-click the virtual directory you just created,
and click Properties.
- Click the HTTP Headers tab, then click the MIME Types button.
- Click New. A dialog appears that allows you to define a new MIME type.
- For Extension, type ".*" (do not include the quotes).
- For MIME type, type "File" (do not include the quotes).

- Click OK to add the new MIME type and exit IIS Manager.
C. Add the cache directory to your server
Once you've given the SOC account permissions to access the cache folder,
and created the virtual directory if you're using ArcGIS Server 9.3, you're ready to add the cache directory to your server.
To add a server cache directory, perform the following steps within ArcGIS Server Manager:
- Click the GIS Server tab.
- From the View menu on the left, click Directories (or "Server
Directories" ifyou are using Java Manager).
- Click Add Directory.
- For the path to the directory, enter the path to the cache
folder on the ArcGIS Data Appliance (for example, "\\APPLIANCE\cache").
- From the Type dropdown list, choose Cache.
- For the Virtual Directory:
- For ArcGIS Server 9.3.1, leave it blank.
- For ArcGIS Server 9.3, enter the URL to the virtual directory you
created in step 3A. The URL will include your Web server machine name and the alias you selected for
your virtual directory. For example, if you created the virtual directory on a machine
named Server1 and the alias you chose for the virtual directory was VirtualCache, the URL
would be http://Server1/VirtualCache.
- You do not need to specify a Description, Cleaning Mode, or Maximum
File Age.

Specifying server cache directory properties in ArcGIS Server Manager 9.3.
- Click OK to add the directory. By default, you'll return to the list of
output directories. To verify that the cache directory was created successfully,
you can select Cache Directories from the Show dropdown menu.
NOTE: If you are deploying the
ESRI_PlaceLabels_World service, you must create an additional server cache directory that
points to \cache\GlobeCache\ESRI_PlaceLabels_World_20070331. For ArcGIS Server 9.3, when defining the properties
of this directory, you can use the same virtual directory you created above and extend the
URL to include /GlobeCache/ESRI_PlaceLabels_World_20070331. Later on, when you publish the
ESRI_PlaceLabels_World service, be sure to select this as the server cache directory.
NOTE: ArcGIS Server for the Microsoft .NET Framework deployments with REST applications must configure an IIS application pool to run using the ArcGIS Web Services user that was established/created during the ArcGIS Server post install. This is not necessary for ArcGIS Server for Java Platform installations using REST applications. To do this, see Create an application pool to improve system performance.
Linux with Apache
First you need to mount the shares you created, and for ArcGIS Server 9.3 you need to create a virtual directory in
Apache. Then you add the cache directory to your server.
A. Mount the shares you just created
- From the Linux host, using the Linux shell script below as an example,
mount the shares that were created in step 1:
mount.cifs //esri_data/source_world /media/SourceWorld -o user=demo_user,password=demo
mount.cifs //esri_data/cache_world /arcgis/server/serverdir/arcgiscache/ -o user=demo_user,password=demo
B. Create a virtual directory in Apache
For ArcGIS Server 9.3.1, skip to step 3C: Add the cache directory to your server.
For ArcGIS Server 9.3, you need to create a virtual directory that will reference the directories on
the ArcGIS Data Appliance. A virtual directory allows client applications to access the
cache directory using a URL, which is often the fastest way to get the tiles.
Apache has a concept of virtual directories which maps a URL path to a location
on disk. It is necessary to create a virtual directory to work with the cached content on
the ArcGIS Data Appliance.
- Back up your httpd.conf file found at <Apache install
location>\conf.
- Open your httpd.conf file in a text editor. See if there are any
directory entries for your cache directory already. It would look something like this
in most cases:
## Entry for the data appliance (world collection)
Alias /dataapp/cache_wc "//esri-da-01/cache_wc"
- If the directory does not exist, add an Alias entry to the httpd.conf
file.
- Save the changes to the httpd.conf file.
C. Add the cache directory to your server
Once you've mounted the shares, and created the virtual directory if you're using ArcGIS Server 9.3,
you're ready to add the cache directory to your server. To add a server cache directory,
perform the following steps within ArcGIS Server Manager:
- Click the GIS Server tab.
- From the View menu on the left, click Directories (or "Server
Directories" if you are using Java Manager).
- Click Add Directory.
- For the path to the directory, enter the path to the cache
folder on the ArcGIS Data Appliance (for example, "\\APPLIANCE\cache").
- From the Type dropdown list, choose Cache.
- For the Virtual Directory:
- For ArcGIS Server 9.3.1, leave it blank.
- For ArcGIS Server 9.3, enter the URL to the virtual directory you
created in step 3B. The URL will include your Web server machine name and the alias you selected
for your virtual directory. For example, if you created the virtual directory on a machine
named Server1 and the alias you chose for the virtual directory was VirtualCache, the URL
would be http://Server1/VirtualCache.
- You do not need to specify a Description, Cleaning Mode, or
Maximum File Age.
- Click OK to add the directory. By default, you'll return to the list
of output directories. To verify that the cache directory was created successfully,
you can select Cache Directories from the Show dropdown menu.
Step 4: Create the services
The most important step for deploying the ArcGIS Data Appliance is to create
map and globe services. These services will reference the caches and map and globe
documents on the appliance. You create these services the same way you create any other
ArcGIS Server service.
Creating map services
Follow these instructions for each 2D map service that you want to create:
- In ArcGIS Server Manager, click the Services tab.
- Click Add New Service.
- In the Name field, enter the exact name of the corresponding map cache
folder on the ArcGIS Data Appliance, for example, World_Physical_Map. The name of the
service must exactly match its cache folder name.
- Verify that the Type is Map Service and the Startup Type is Automatic. Then,
click Next.
- In the Map Document field, browse to the source_documents\2D_map_documents folder on
the ArcGIS Data Appliance and select the map document that you would like to publish.
- In the Server Cache Directory field (or "Cache Directory" if you are using
Java Manager), select the cache directory you added that references the cache
directory on the ArcGIS Data Appliance. If you don't see the directory listed, you will
need to revisit the section in this document titled Configure ArcGIS Server
to use the cache directory on the ArcGIS Data Appliance.
- You've set all of the essential properties for your service, so accept
the rest of the default properties and create the service. If you want to make an
adjustment to the service, such as changing the maximum number of instances that can be
created, you can edit the properties in Manager.
- If necessary, start the service in Manager by checking the box next to the
service name and clicking Start.
- Repeat this process for any other map services you want to configure.
Creating globe services
Follow these instructions for each 3D globe service that you want to create:
- In ArcGIS Server Manager, click the Services tab.
- Click Add New Service.
- In the Name field, enter a name for the service. You can enter any name,
although you may want to consider using the naming conventions from the service description,
for example, ESRI_PlaceLabels_World.
- Verify that the Type is Globe Service and the Startup Type is Automatic.
Then, click Next.
- In the Globe Document field, browse to the
source_documents\3D_globe_documents folder on the ArcGIS Data Appliance and
select the globe document that you would like to publish.
- In the Server Cache Directory field (or "Cache Directory" field if you are
using Java Manager), select the cache directory you added that references the cache
directory on the ArcGIS Data Appliance. If you don't see the directory listed, you'll need
to revisit the section in this document titled Configure ArcGIS Server to
use the cache directory on the appliance.
- You've set all of the essential properties for your service, so accept
the rest of the default properties and create the service. If you want to make an adjustment
to the service, such as changing the maximum number of instances that can be created, you
can edit the properties in Manager.
- If necessary, start the service in Manager by checking the box next to the
service name and clicking Start.
- Repeat this process for any other globe services you want to configure.
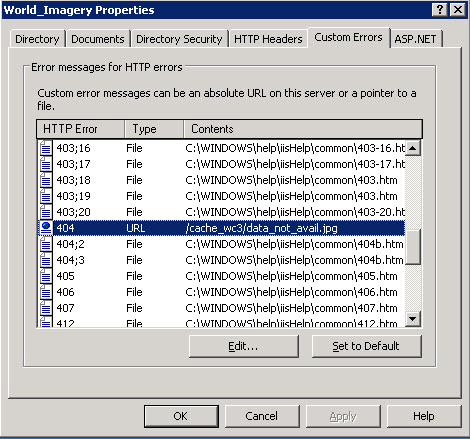
Step 5: Configure your Web server to return a blank or no data tile for empty map areas
For ArcGIS Server 9.3 on Windows with IIS, you need to configure your Web server to return a "Data not available tile" for
empty areas of your imagery services. To display the tile, you need
to create a custom error response on your virtual cache directory for HTTP Error 404:
"Not Found". Instead of an error message, the Web server returns the tile. The data_not_avail.jpg tile is located on the ArcGIS Data Appliance in the
cache folder and is intended for use with imagery services.
For ArcGIS Server 9.3.1, this step is not needed; the ArcGIS tile handler automatically returns a blank or no data tile for empty map areas.
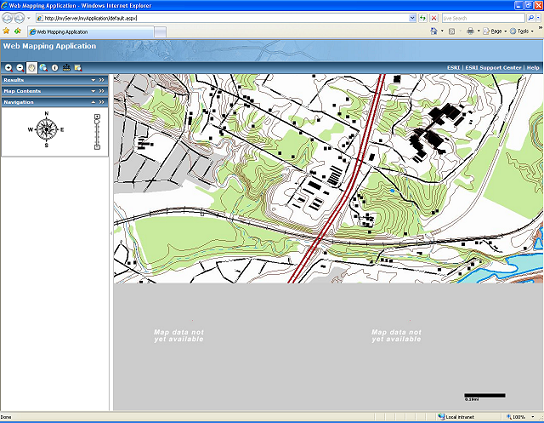
In the Web
application above, the Web server was configured to return a gray tile with the message
"Map data not yet available" in places where the cache has not been generated.
Following are steps for configuring Internet Information Services (IIS) 6.0 to
return a "Data not available" tile. These steps are optional for the World Imagery basemap service, but you may find they improve
the usability of the service.
- Navigate to Control Panel > Administrative Tools > Internet
Information Services (IIS) Manager.
- Navigate to the virtual cache directory, and find the folder containing
the World_Imagery map cache.
Right-click the folder, and click Properties.

- Click the Custom Errors tab, scroll down, and select the 404 error code.
- Click the Edit button. In the URL box, specify the tile that IIS should
return whenever a tile is missing. Use a relative URL and not just a path to a file.
- Click OK. Your dialog should look similar to the one below. Click OK
again to return to IIS Manager.
Step 6: Use the services
For specific instructions on how to connect to your services and create basemaps
from them, see the appropriate user guide for the ArcGIS application you are using: