
The Web Applications feature allows you to administer your GIS Server. The Web Applications feature installs components on the Web server and includes ArcGIS Server Manager, the application for administering your GIS server, building Web mapping applications, and managing ArcGIS Explorer maps. Through it, you can publish maps, globes and other GIS resources, publish and manage ArcGIS Explorer maps, and create Web applications.
Add ArcGIS Server Instance Tool
The Add ArcGIS Server Instance Tool allows you to add an additional ArcGIS Server instance or modify (remove or update) an existing instance. This tool is installed with the Web Applications feature. To launch the tool, run the <ArcGIS installation location>\ArcGIS\DotNet\AddInstance.exe. For information on the Add ArcGIS Server Instance Tool see the ArcGIS Server Help.
Verify that your site meets the system requirements. For system requirement information see Step 1: Verify your system requirements.
Log in as a user with administrative privileges.
Close all applications on your computer.
Insert the ArcGIS Server for the Microsoft .NET Framework media into the appropriate drive to automatically launch the setup program.
|
Tips ArcGIS Server for the Microsoft .NET Framework requires:
|
During the installation you will be asked to read the license agreement and accept it, or exit if you don't agree with the terms.
The ArcGIS Server install allows you to select the features you would like to install.
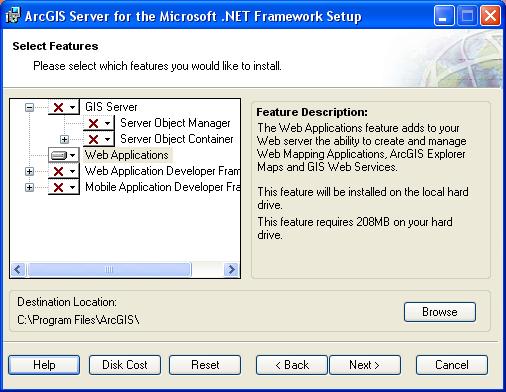
At the Select Features dialog box, select the Web Applications feature. Click the dropdown arrow to the left of the Web Applications feature. From the list, select Will be installed on local hard drive to install Web Applications. Unselect all other features and choose Entire feature will be unavailable, to unselect these feature for installation.
At the ArcGIS Server Instance dialog, enter the instance name and port number. See Non-default IIS configurations for more information.

Microsoft IIS required
The Web Applications feature requires Microsoft IIS. If Microsoft IIS is not detected on your machine, the Web Applications feature will not be available for installation. For the latest supported Microsoft IIS versions, visit http://support.esri.com, select Software > ArcGIS Server > System Requirements. See Feature dependencies for more information.
Notes on installing ArcGIS 9.3 products
The ArcGIS 9.3 products, ArcGIS Engine Runtime, ArcGIS Desktop, ArcReader standalone, and ArcGIS Server will install to the same installation directory. The first ArcGIS 9.3 product installed will determine the installation location for all subsequent ArcGIS 9.3 products. For example, if ArcGIS Desktop is installed to C:\Desktop, the installation location for ArcGIS 9.3 will be C:\Desktop\ArcGIS. If you install ArcGIS Server for the Microsoft .NET Framework next, you will not be provided with the opportunity to browse to an installation location. The ArcGIS Desktop installation has predetermined the installation location for all ArcGIS 9.3 products. Therefore, in this example, ArcGIS Server for the Microsoft .NET Framework will also be installed to C:\Desktop\ArcGIS. If you run out of disk space while installing an ArcGIS 9.3 product, you will need to uninstall all ArcGIS 9.3 products (listed above) and reinstall them to a location where more disk space is available. ArcGIS 9.3 products (excluding ArcSDE, ArcIMS and ArcInfo Workstation) cannot be installed to different locations. NOTE: If you have ArcIMS ArcMap Server 9.3 already installed, ArcGIS 9.3 products will default to the ArcIMS installation location.
To complete the installation, follow the directions on the screen.
Complete the post installation setup
After completing the ArcGIS Server for the Microsoft .NET Framework installation, you will be provided with the opportunity to begin the Web Applications post installation setup.
Web Applications post installation