Open topic with navigation
You are here: Deployment > Deploying a routing service
Deploying a routing service
The European Routing and North American Routing services included on the ArcGIS Data Appliance with routing option enable you to create street-level, optimized routes between two or more points to display along with associated driving directions.
NOTE: See Requirements for a list of supported environments.
To use a routing service, you need to
If you want to use multiple languages in your routing directions, see the instructions for setting up support for multiple languages in your routing directions.
Deploying a routing service using ArcGIS Server Manager
The following steps walk you through the deployment process on ArcGIS Server Manager.
NOTE: If you used the "Data only" deployment option, complete step 1; otherwise, skip to step 2.
- Copy the files from the Routing directory on the file transfer device to your GIS server, for example, to \\MyServer\routing\ESRI_Route_EU C:\ArcGIS\. You can use Windows Copy and Paste tools or another copy utility.
- Open ArcGIS Server Manager and log in using the ArcGIS Administrator account.
- Expand the Services tab on the left, and Click Add New Service. You can create a service in the root folder, or use the Manage Folders dropdown to select another location for the new sservice.

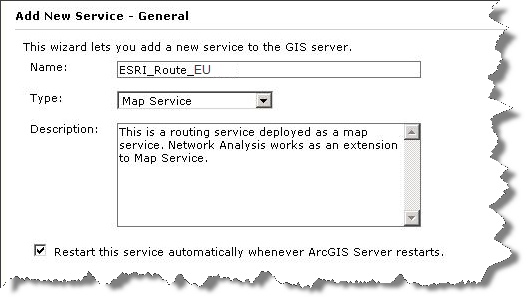
- On the Add New Service dialog:
- In the Name field, enter the name of the routing service, for example, ESRI_Route_EU or ESRI_Route_NA.
- For the Type, select Map Service. A Description can also be provided if desired.
- Make sure "Restart this service automatically..." is checked, and click Next.
- On the Parameters dialog:
- In the Map Document field, enter the path to the map document for the routing service, for example, \\MyServer\routing\ESRI_Route_EU\source_documents\2D_map_documents\ESRI_Route_EU.mxd.
- Select an Output Directory and Server cache directory.
- Click Next.
- On the Capabilities dialog:
- Make sure Mapping (always enabled) is checked.
- Check Network Analysis.
- Check Enable web access.
- Click Next.

- On the Pooling dialog, set the timeout and pooling options, and click Next.
- On the Processes dialog, set the process isolation and recycle time, and click Next.
- On the Summary dialog, review the information for the service you have created, and click Finish to create the service and start using it.

Setting up support for multiple languages in the routing directions
To use multiple languages in the routing directions for Network Analyst services, you need to copy the directions.lng file (77 KB) to your GIS server. Then you can use multiple languages in the routing directions for your SOAP and REST applications.
NOTE: See Requirements for a list of supported environments.
NOTE: The Network Analyst service can only be consumed through applications built using either SOAP or REST.
Follow these steps to set up support for multiple languages in routing directions for Network Analyst:
- Copy the directions.lng file from the Routing directory on the data appliance to the Directions folder on your GIS server to <ArcGIS Server install location>\NetworkAnalyst\Directions. You can use Windows Copy and Paste tools or another copy utility.
- You can use multiple languages in the routing directions for your SOAP and REST applications by setting the appropriate parameter for your API using a supported language code:
- SOAP parameter:
naServerRouteParams.DirectionsLanguage = "de_DE";
- REST parameter:
directionsLanguage
Supported Languages (codes)
- Danish (da_DK)
- Dutch (nl_NL)
- English (en_US) - default language
- French (fr_FR)
- German (de_DE)
- Italian (it_IT)
- Norwegian (no_NO)
- Portuguese (pt_PT)
- Spanish (es_ES)
- Swedish (sv_SE)