
In SharePoint, create a new document library. For the document template, select Microsoft Office Word document, Microsoft Office Excel spreadsheet, or Microsoft Office PowerPoint presentation.
On the document library's page, select Settings --> Create Column to create columns to store each document's geographic data. For example, for documents that will each have an associated address, you might add columns for Address, City, State, and Zip:

Click New to create a new document. The Document Properties pane will be visible and will have textboxes for the columns you added to the document library:

Populate the appropriate document properties with the geographic data:

Save the document. Notice that, in the document library, the columns you added have been populated with the location you specified:

Your Microsoft Office Document Library is now ready to be added to the ArcGIS Map Web Part. Since document libraries are essentially just a specialized type of SharePoint list, you can add the document library to the map using the information presented in the adding SharePoint lists topic. Then, as you would with any SharePoint list, you must tell ArcGIS Mapping how your form library stores geographic information by configuring Location Fields.
As outlined above, Microsoft Office document libraries can be plotted on a Map Web Part by using geographic information stored in the document's properties. Since Microsoft Office Word documents support editing document properties from the document surface (not the properties pane), it is possible to map Word documents based on document content. The steps to enable this functionality are outlined below:
Create a document library and give the library geographic columns as outlined in steps 1 and 2 of the previous section.
Click Settings --> Document Library Settings.
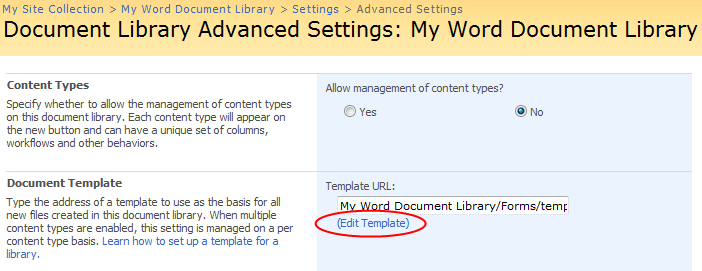
From the General Settings column, click Advanced Settings.
Below the Template URL textbox, click the Edit Template link (shown below). This will open the document library's template in Word for editing.
 On the Insert tab, select Quck Parts --> Document Property. Notice the columns you added to the document library appear in the menu.
Select the geographic properties from the Document Property menu to add them to the Word document. Add labels and formatting as desired:

Save and close the document template.
If the Document Library Advanced Settings page is still open in your browser, click the Cancel button to close it.
From the document library's default view, click New to create a new document. The Word document that opens should match the template you just saved.
Specify the geographic information for the document in the fields that you added in step 6:

Save and close the document. Notice that, in the document library, the geographic information you specified inside the Word document has been saved out to the corresponding document library columns:

The document library can now be mapped and configured within the ArcGIS Map Web Part just like any other SharePoint list. See the topic on adding SharePoint lists for further information.