


 Syntax
| Visual Basic (Declaration) | |
|---|---|
Public Event MouseLeave As MouseEventHandler | |
| C# | |
|---|---|
public event MouseEventHandler MouseLeave | |
Event Data
The event handler receives an argument of type MouseEventArgs containing data related to this event. The following MouseEventArgs properties provide information specific to this event.
| Property | Description |
|---|---|
| Device (Inherited from System.Windows.Input.InputEventArgs) | |
| Handled (Inherited from System.Windows.RoutedEventArgs) | |
| LeftButton | |
| MiddleButton | |
| MouseDevice | |
| OriginalSource (Inherited from System.Windows.RoutedEventArgs) | |
| RightButton | |
| RoutedEvent (Inherited from System.Windows.RoutedEventArgs) | |
| Source (Inherited from System.Windows.RoutedEventArgs) | |
| StylusDevice | |
| Timestamp (Inherited from System.Windows.Input.InputEventArgs) | |
| XButton1 | |
| XButton2 |
Example
How to use:
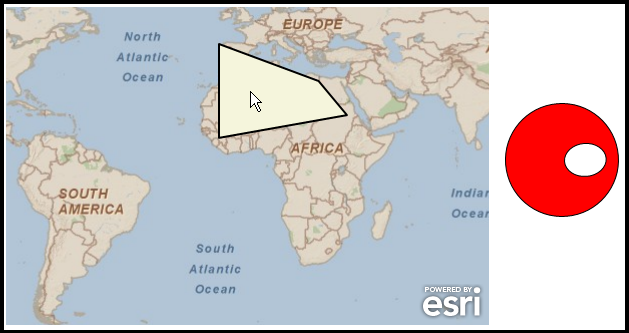
Move the mouse cursor over the Polygon Graphic in the Map to begin animating the custom Path object. When the mouse cursor exits the polygon the animation will stop.
The following screen shot corresponds to the code example in this page.
| XAML |  Copy Code Copy Code |
|---|---|
<Grid x:Name="LayoutRoot"> <!-- Define some Resources that can be used in other parts of the XAML file. --> <Grid.Resources> <!-- Define a SimpleFillSymbol to use as the initial display of the Graphics on the Map. --> <esri:SimpleFillSymbol x:Key="theSimpleFillSymbol" Fill="Beige" BorderBrush="black" BorderThickness="2" /> <!-- Define a SpatialReference object that has the same WKID as the ArcGISTiledMapServiceLayer in the Map. --> <esri:SpatialReference x:Key="theSpatialReference" WKID="4326"/> <!-- Define a Storyboard that will rotate a custom Path (called myPath) infinately using a RenderTransform. This XAML was originally created in a Blend 4 project and copied into this Visual Studio project. --> <Storyboard x:Name="Storyboard1" RepeatBehavior="Forever"> <DoubleAnimationUsingKeyFrames Storyboard.TargetProperty="(UIElement.RenderTransform).(CompositeTransform.Rotation)" Storyboard.TargetName="myPath"> <EasingDoubleKeyFrame KeyTime="0" Value="0"/> <EasingDoubleKeyFrame KeyTime="0:0:0.125" Value="45"/> <EasingDoubleKeyFrame KeyTime="0:0:0.25" Value="90"/> <EasingDoubleKeyFrame KeyTime="0:0:0.375" Value="135"/> <EasingDoubleKeyFrame KeyTime="0:0:0.5" Value="180"/> <EasingDoubleKeyFrame KeyTime="0:0:0.625" Value="225"/> <EasingDoubleKeyFrame KeyTime="0:0:0.75" Value="270"/> <EasingDoubleKeyFrame KeyTime="0:0:0.875" Value="315"/> <EasingDoubleKeyFrame KeyTime="0:0:1.0" Value="360"/> </DoubleAnimationUsingKeyFrames> </Storyboard> </Grid.Resources> <!-- Add a Map control with an ArcGISTiledMapServiceLayer and a GraphicsLayer. The GraphicsLayer will contain one Graphic based upon Polygon geometries (which use the defined SpatialReference) and using the theSimpleFillSymbol as the default symbolization. --> <esri:Map Background="White" HorizontalAlignment="Left" Margin="12,111,0,0" Name="Map1" VerticalAlignment="Top" Height="318" Width="483" > <esri:ArcGISTiledMapServiceLayer ID="PhysicalTiledLayer" Url="http://services.arcgisonline.com/ArcGIS/rest/services/ESRI_StreetMap_World_2D/MapServer"/> <!-- It is important to provide the GraphicsLayer with an 'ID' Attribute so to be able to access it in the code-behind file. --> <esri:GraphicsLayer ID="MyGraphicsLayer" > <esri:GraphicsLayer.Graphics> <!-- Define a Polygon Graphic using the StaticResources for the Symbol and SpatialReference. The Graphic has MouseEnter and MouseLeave Events defined that use code-behind functions. --> <esri:Graphic Symbol="{StaticResource theSimpleFillSymbol}" MouseEnter="Graphic_MouseEnter" MouseLeave="Graphic_MouseLeave"> <esri:Polygon SpatialReference="{StaticResource theSpatialReference}"> <esri:Polygon.Rings> <esri:PointCollection> <esri:MapPoint X="-10" Y="10" /> <esri:MapPoint X="-10" Y="43" /> <esri:MapPoint X="25" Y="30" /> <esri:MapPoint X="35" Y="18" /> <esri:MapPoint X="-10" Y="10" /> </esri:PointCollection> </esri:Polygon.Rings> </esri:Polygon> </esri:Graphic> </esri:GraphicsLayer.Graphics> </esri:GraphicsLayer> </esri:Map> <!-- The myPath object was created using Blend 4 and copied into this Visual Studio project. It is a circle with an embedded ellise that will rotate infinately because it uses StoryBoard animation defined in the Resources section of this XAML. --> <Path x:Name="myPath" Fill="Red" Margin="511,207,0,0" Stretch="Fill" Stroke="Black" UseLayoutRounding="False" RenderTransformOrigin="0.5,0.5" HorizontalAlignment="Left" Height="114" VerticalAlignment="Top" Width="114" Data="M180.5,38.5 C152.33348,38.5 129.5,67.377632 129.5,103 C129.5,138.62236 152.33348,167.5 180.5,167.5 C208.66652,167.5 231.5,138.62236 231.5,103 C231.5,67.377632 208.66652,38.5 180.5,38.5 z M175,0.5 C271.37369,0.5 349.5,78.626312 349.5,175 C349.5,271.37369 271.37369,349.5 175,349.5 C78.626312,349.5 0.5,271.37369 0.5,175 C0.5,78.626312 78.626312,0.5 175,0.5 z" > <Path.RenderTransform> <CompositeTransform /> </Path.RenderTransform> </Path> <!-- Provide the instructions on how to use the sample code. --> <TextBlock Height="64" HorizontalAlignment="Left" Name="TextBlock1" VerticalAlignment="Top" Width="442" TextWrapping="Wrap" Margin="12,12,0,0" Text="Move the mouse cursor over the Polygon Graphic in the Map to begin animating the custom Path object. When the mouse cursor exits the polygon the animation will stop." /> </Grid> | |
| C# | Copy Code |
|---|---|
private void Graphic_MouseEnter(object sender, System.Windows.Input.MouseEventArgs e) { // This function will obtain the Storyboard1 object from the Resources section of the // XAML file. The Storyboard.Begin function invokes the animation of a circle with an // embedded ellipse to rotate continuously while the mouse cursor is over the Polygon // Graphic object in the Map. The sender input parameter of this function is the // Polygon Graphic. Storyboard sb = (Storyboard)(LayoutRoot.Resources["Storyboard1"]); sb.Begin(); } private void Graphic_MouseLeave(object sender, System.Windows.Input.MouseEventArgs e) { // This function will obtain the Storyboard1 object from the Resources section of the // XAML file. The Storyboard.Stop function terminates the animation of a circle with an // embedded ellipse that is rotating continuously when the mouse cursor exits the Polygon // Graphic object in the Map. The sender input parameter of this function is the // Polygon Graphic. Storyboard sb = (Storyboard)(LayoutRoot.Resources["Storyboard1"]); sb.Stop(); } | |
| VB.NET | Copy Code |
|---|---|
Private Sub Graphic_MouseEnter(ByVal sender As System.Object, ByVal e As System.Windows.Input.MouseEventArgs) ' This function will obtain the Storyboard1 object from the Resources section of the ' XAML file. The Storyboard.Begin function invokes the animation of a circle with an ' embedded ellipse to rotate continuously while the mouse cursor is over the Polygon ' Graphic object in the Map. The sender input parameter of this function is the ' Polygon Graphic. Dim sb As Storyboard = DirectCast(LayoutRoot.Resources("Storyboard1"), Storyboard) sb.Begin() End Sub Private Sub Graphic_MouseLeave(ByVal sender As System.Object, ByVal e As System.Windows.Input.MouseEventArgs) ' This function will obtain the Storyboard1 object from the Resources section of the ' XAML file. The Storyboard.Stop function terminates the animation of a circle with an ' embedded ellipse that is rotating continuously when the mouse cursor exits the Polygon ' Graphic object in the Map. The sender input parameter of this function is the ' Polygon Graphic. Dim sb As Storyboard = DirectCast(LayoutRoot.Resources("Storyboard1"), Storyboard) sb.Stop() End Sub | |
Remarks
The Graphic.MouseLeave is useful for capturing when the user has moved the mouse, stylus, or touch out of the bounding area of a Graphic. Some useful scenarios for taking advantage of the Graphic.MouseLeave Event include:
- Clear any information that was being displayed in another control about Attribute information for a Graphic (see the code example in the Graphic.MouseEnter documentation)
- Stop an animation on another control as a result of focus of a particular Graphic being lost (see the code example in this document)
- Take a particular action based upon a different StylusDevices being used
There are two input parameters that are passed into the Graphic.MouseLeave Event when it is fired, they are: sender and e.
sender is the Graphic for which the mouse, stylus, or touch has just exited its bounding area.
e is a System.Windows.Input.MouseEventArgs and has two Properties: StylusDevice and OriginalSource. One of most important Properties of StylusDevice is the DeviceType which will tell whether the pointer that has exited the Graphic is a mouse, stylus or touch. The OriginalSource Property gets a reference to the object that raised the event.
Modifying the symbology of a Graphic to give the appearance of a selection as a result of the Graphic.MouseEnter or Graphic.MouseLeave Events is in general not a good practice. The reason for this statement is that each time the symbology of a Graphic changes, it must be re-rendered which will re-invoke MouseEnter and MouseLeave Events and thereby cause a flickering effect. A better programming practice for giving the appearance of have a Graphic appear to be selected is to use the System.Windows.VisualStateManager. See the code examples of Graphic.Selected Property and Graphic.Select Method for examples of using the System.Windows.VisualStateManager.
Requirements
Target Platforms: Windows XP Professional, Windows Server 2003 family, Windows Vista, Windows Server 2008 family