| 3. | Click the |
Lock multi-images sample
Lock multi-images provides useful features for users to work with overlapping imagery. For example this tool can be used to detect change and improve the determination of overlaps in existing imagery. Lock multi-images provides users with the Rasters in Current View table listing images that intersect with the current view along with their associated attributes. The user can then select one or more intersecting images of interest in the table. When the user clicks OK in the table window, a new group layer is created for each selected raster and this layer is locked to the selected rasters.
Lock multi-images also enables the user to output shape files defining mosaic limits of the current view and shape files that define footprints of images in the current view.
Software requirements
| • | Products:Microsoft Visual Basic 6.0 |
| • | Platforms:Microsoft Windows |
| • | Minimum Requirements: ArcGIS 9.2 or higher versions |
The following table lists the project files that you need in order to run the Lock multi-images feature in ArcMap.
Project Files |
Description |
LockMultiImages.vbp |
The VB project file for Lock multi-images. |
clsExport.cls |
The VB class file contains the ICommand implementation. |
Module1.bas |
This bas module contains important functions that are used throughout the project. |
Form1.frm |
The VB form contains the Attribute table control used for the display of rasters. |
LockMultiImages.dll |
The compiled project. |
|
The sample VB6 files for the Lock MultiImages feature are in \Program Files\ImageServer10.0\Developer Kit\Client Applications\Samples\LockMultiImages folder. |
Key Libraries: Catalog, CatalogUI, System, DataSourcesFile, Carto, GeoDatabase, Display,Geodatabase,
Geometry,Datasource,ArcMap
Key Interfaces: ICommand, IMxDocument, IApplication, ITablewindow,ILayer
How to use:
| 1. | Start ArcMap. |
| 2. | Click Tools on the Main menu and click Customize. |
The Customize dialog box is displayed.
| 3. | Click the Commands tab on the Customize dialog box. |
| 4. | Choose Image Server in the Categories list. |
The associated commands for Image Server appear in the Commands list.
| 5. | Drag and drop the LockMultiImages command onto a toolbar in the ArcMap window. |
Lock multi-images is a plugin tool available with the Image Server Developer Kit. Lock multi-images appears as a button that can be added to the ArcMap toolbar. You can use this tool to—
| • | Add the selected rasters (in an AOI) as layers to the Table of Contents in ArcMap. |
| • | Lock the rasters. |
| • | Analyze the different rasters. |
| • | Sort and add the rasters to the Table of Contents |
| • | Export attributes |
| • | Create mosaic shapes and footprints for the selected rasters. |
The rasters can be sorted and listed based on the temporal attributes, such as month, date, etc. The difference between the sorted rasters can be used for NDVI analysis, physical change in the terrain, etc. For example, if you sort the rasters based on the month attribute, you can view changes in the physical appearance of an AOI of the image service.
How to add the Lock multi-images button in ArcMap:
| 1. | Start ArcMap. |
| 2. | Click Tools on the Main menu and click Customize. |
The Customize dialog box is displayed.
| 3. | Click the Commands tab on the Customize dialog box. |
| 4. | Choose Image Server in the Categories list. |
The associated commands for Image Server appear in the Commands list.
| 5. | Drag and drop the Lock Multi-images command onto a toolbar. |
How to register Lock multi-images to the Command list:
| 1. | Click the Add from file button. |
| 2. | Browse to the location where you have installed ArcGIS Image Server (<Image Server install directory>\Developer Kit\Client Applications\Samples\LockMultiImages\Bin\LockMultiImages.dll) |
| 3. | Click the Open button in the Open file dialog box. |
The Lock Multi Images option appears in the Commands list.
| 4. | Drag and drop the Lock Multi-images command onto a toolbar. |
Note: To use the Lock Multi-images button, you need to open an Image Service.
How to lock rasters in the displayed image service:
| 1. | Click the Image Service layer in the Table of Contents. |
| 2. | Zoom in to a particular AOI in the image service layer. |
| 3. | Click the |
Important: Make sure that the required image service layer is visible on the Table of Contents before you click the Lock Multi Images button.
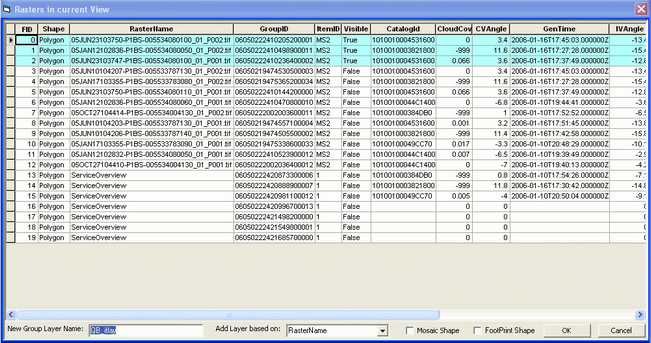
The Rasters in current view window is displayed. This window shows all the rasters that are visible in the selected AOI and the value in the Visible field will be True. Rasters not visible in the AOI will appear as unselected in the list and the Visible field will be False.
| 4. | Type in a new name for the Image Service group layer in the New Group Layer Name text box. |
| 5. | Select a field name from the Add Layer based on drop-down box. |
Each selected raster will appear as a separate layer based on the selected field.
| 6. | Click the Create Mosaic Shape check box to extract the mosaic shapes for the selected rasters in the current view along with the attributes. |
| 7. | Click the Footprint check box to create footprints for the selected rasters in the current view. |
| 8. | Click OK to add the selected rasters in the list to the Table of Contents. |
Specifying non-standard field types
There can be cases where you need to customize the data type for non-standard fields, such as CatalogID. For this you need to add the required non-standard field in the LockMultiImages.ISConfig file available at \Program Files\ArcGIS\ImageServer10.0\XADefs\. The LockMultiImages.ISConfig file accepts fields of type String and Number. Displayed below is a snippet from the LockMultiImages.ISConfig file.
<ImageServer>
<LockMultiImages>
<Metadatafields>
<Field>
<FieldName>RasterName</FieldName>
<FieldType>String</Fieldtype>
</Field>
<Field>
<FieldName>CloudCover</FieldName>
<FieldType>Number</Fieldtype>
</Field>
</Metadatafields>
</LockMultiImages>
</ImageServer>
In the code sample shown above, you can specify your custom field within the <FieldName></FieldName> node and specify the field type string or number within the <FieldType></Fieldtype> node. The custom field should be enclosed in the LockMultiImage and Metadatafield nodes.