Welcome to the quick-start tutorial, your introduction to Internet GIS application development using ArcIMS. This tutorial guides you through the three main steps required to publish map content on the Internet using ArcIMS - creating a map for the Web, publishing your map as a service, and creating a Web application.
In this tutorial you'll be creating a Web site for sales representatives who want to evaluate their business in the San Francisco area. You'll create a map by adding base geographic and business data, then setting layer properties. The map will show store and customer locations for two stores, ZIP Code boundaries, and the trade area within which 80 percent of the customers live. Next, you'll create an Image Service for your map. Last, you'll design your Web site by choosing a viewer, specifying which page elements to include, and defining the GIS functionality of the Web site.
If you haven't installed the tutorial sample data, run the ArcIMS installation wizard again to install it. For more information, see "Performing a typical installation" in Step 3a of the Installation Guide.
Exercise 1: Creating a map for the Web
This exercise introduces you to creating a map using ArcIMS Author. Creating a map involves adding data layers, setting layer properties, and setting map properties.
Starting Author
- To start ArcIMS Author:
Windows: Click Start | Programs | ArcGIS | ArcIMS | Author.
UNIX and Linux: Type aimsauthor at the prompt.
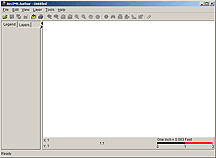
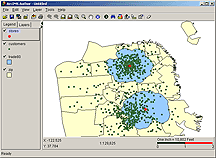
ArcIMS Author opens.
|
|
Creating a new map
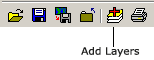
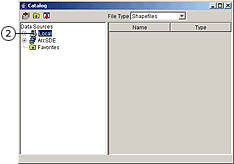
- Click the Add Layers button on the Author toolbar to open Catalog.
Catalog opens. The left panel lists the available data source directories.
- Under Data Sources, double-click Local.
|
|
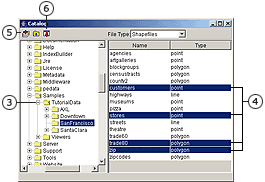
- Navigate to the ArcIMS installation directory. The default path to the tutorial data folder is <ArcIMS Installation Directory>/arcims/Samples/TutorialData/SanFrancisco. In Catalog, click ArcIMS, Samples, TutorialData, and SanFrancisco.
In the File Type dropdown box, Shapefiles is selected. Shapefiles belonging to the SanFrancisco folder are listed in the right panel. The type of shapefile - point, line, or polygon - is also shown.
- Click customers in the shapefiles list and, holding down the Ctrl key, click stores, trade80, and zip. All four shapefiles are highlighted.
- Click the Add Layers button. The layers are added to your map.
- Click the Close button. Catalog closes, and the shapefiles you just added appear in the legend.
|
|
- Check each layer in the legend to draw it on the map.
- Click the Save button on the Author toolbar.
- In the Save dialog box, navigate to the directory where you want to save the configuration file, generally the working directory you specified when installing ArcIMS. The default directory is /arcims/AXL.
- Type SFBusiness as the name for the configuration file in the File name text box.
- Click Save. The Save dialog box closes, and your map is saved as the configuration file SFBusiness.axl.
|

|
Changing the layer drawing order
Layers draw in the order that they are listed in the legend. Layers at the top of the legend draw on top of those listed below. To create a readable map with no hidden features, you must reorder the layers. Establish the following order from top to bottom: stores, customers, trade80, and zip.
- Click the stores layer in the legend to make it active. A black outline indicates that stores is the active layer.
- Click the stores layer again; drag it to the top of the legend.
- Release the mouse button, dropping the layer into its new position. Stores appears at the top of the list of layers. It is followed by customers, trade80, and zip. If for some reason the order of your layers is different, continue to drag and drop until you have established the desired order.
|
|
Setting layer properties
All properties of a layer are controlled through the Layer Properties dialog box. The Layer Properties dialog box can be accessed in four ways, two of which are demonstrated in the following steps.
To make it easier to see stores and customers on your map, you will need to change their symbology.
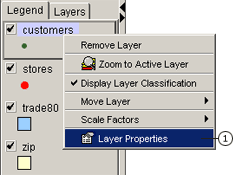
- Right-click the stores layer and click Layer Properties. The Layer Properties dialog box appears.
|
|
- Click the Draw features using dropdown arrow and click One Symbol.
- Click the Style dropdown arrow and click Triangle.
- Click the Color dropdown arrow and click Red.
- Use the up and down arrows to change the size to 10 or type 10 in the Size text box.
- Click OK.
|

|
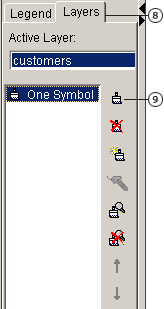
- Click customers in the legend to make it active. A black outline indicates that customers is the active layer.
- Click the Layers tab.
- Click the Edit Selected Renderer button. The layer properties dialog box appears.
|
|
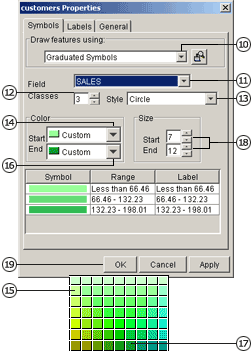
- Click the Draw features using dropdown arrow and click Graduated Symbols.
- Click the Field dropdown arrow and click SALES.
- Type 3 in the Classes text box or change the number of fields to 3 using the up and down arrows.
- Click the Style dropdown arrow and click Circle.
- In the Color panel, click the Start dropdown arrow and click Custom. The Color Chooser dialog box appears.
- Click a light shade of green and click OK.
- Click the End dropdown arrow and click Custom.
- Click a dark shade of green and click OK.
- In the Size panel, type 7 as the start size and 15 as the end size.
- Click OK.
|
|
- Click the Legend tab.
- Review the final map display. If there is not enough contrast in the map, use the layer properties dialog box to continue changing layer symbology.
- Click Save. Your changes to the map are saved to the SFBusiness.axl map configuration file.
- Click the File menu and click Exit to close ArcIMS Author.
|
|
You have successfully authored a map. You can continue with Exercise 2 now or return to it later.
Exercise 2: Creating an Image Service
Before you can incorporate your map in a Web site you must create an ArcIMS service. You can use ArcIMS Administrator to create a service.
Starting Administrator
- To start ArcIMS Administrator:
Windows: Click Start | Programs | ArcGIS | ArcIMS | Administrator.
UNIX or Linux: Type aimsadmin at the prompt.
- If this is the first time you are starting Administrator or Service Administrator, you are prompted to provide a username and password and to confirm them. Type these credentials in the text boxes. Be sure to record these credentials, because you will be asked for them each time you start a new session in either Administrator or Service Administrator. Click OK.
If this is not your first time, you are prompted for your password. The site in this tutorial uses admin as the username.
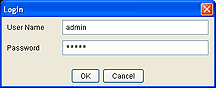
Type your password and click OK.
Administrator starts up, displaying the ArcIMS Administrator window.
Creating the Image Service
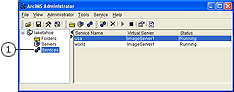
- In the ArcIMS Administrator window, click Services in the left panel.
|
|
- Click the New Service button on the Administrator toolbar.

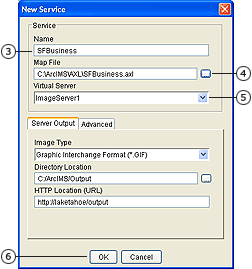
The New Service dialog box appears.
- For the Name, type SFBusiness. (Remember that the name is case sensitive.)
- Click the Browse button beside the Map File text box and navigate to SFBusiness.axl.
- Click the Virtual Server dropdown arrow and click ImageServer1.
- Click OK to create the Image Service and to close the New Service dialog box.
The new service is listed.
- Click the File menu and click Save Configuration to save your changes.
- Click the File menu and click Exit to close ArcIMS Administrator.
|
|
You have successfully created a map and started an Image Service. You can continue with Exercise 3 now or return to it later.
Exercise 3: Creating a Web Mapping Application
In this exercise you will create a Web Mapping Application using ArcIMS Web Manager. Once you have created the application, you can view it in a browser.
- You must install Web Manager separately from the core ArcIMS installation. Web Manager comes in both a .NET and Java version. The Java version is available on all platforms, and the .NET version is available on Windows only. After installing Web Manager, you are now ready to build a Web Mapping Application. If you have not already done so, install ArcIMS Web Manager now. The installation instructions are included with the setup for either the Java or .NET versions.
- Open ArcIMS Web Manager:
- .NET version on Windows: Click Start | Programs | ArcGIS | ArcIMS | ArcIMS Web Manager for the Microsoft .NET Framework.
- Java version on Windows: Click Start | Programs | ArcGIS | ArcIMS | ArcIMS Web Manager for the Java Platform.
- Java version on UNIX and Linux: Navigate to the <ArcGIS install directory>/java/arcims_manager. Note that this is the java directory under ArcGIS and not under ArcIMS. Type ./startmanager at the prompt.
- Enter a username and password.
- .NET version on Windows: Use a username and password that is part of the Administrator group on your machine. Include the domain with your username.
- Java version on all platforms: Use the same username and password that you use for logging into Administrator or Service Administrator. You must already have established a username and password before logging into Web Manager.
- On the first page after logging in, click New Web Application.
- Before proceeding, click the Help link. If at any time you want more information about Web Manager, refer to the Help. After reviewing, close the Help.
- In the Host box, enter the name of the Web server machine on which the application will run. Java users are restricted to the Web Server where Web Manager resides. In the Name box, type a name for your application. This is the name by which you will see your application listed in Manager. Next, type a description. Click Next.
- Select a map service that your application will display.
- First, you need to establish a connection with a GIS server. Click Add GIS Server and select ArcIMS as the connection type. In the dialog box, select TCP and type in your server name. Click Add Server.
- Expand the server to see a list of services.
- Select SFBusiness.
- Click Add to move it into the Current Contents list.
- Click Next.
- The next page allows you to add tasks to your application. Configuring tasks is beyond the scope of this tutorial, but you can find information on working with Tasks in in the Help topic Configuring Tasks. Tasks are optional, so for now click Next to move to the next screen.
- The next two pages are for setting page and map elements.
Page properties include the title, theme, and Web page links. The Title text appears across the top banner of your application, and in the title bar of the browser window. The Theme specifies the top banner graphic and the color scheme of your application's menus. The Web page links appear in the top corner of your application. You can remove or edit the default links, or add your own.
Map elements include a table of contents, overview map, toolbar, and north arrow. Select which elements you want to include with your map. Each one has a Settings button that allows you to configure each map element according to the needs of your application. For example, you can choose an icon that will be used for the North Arrow. For each map element, you can also choose whether it will be visible when the application starts.
When you finish setting properties on each page, click Next.
- Review the information on the summary page. Take note of the URL, so that you can access it later.
- Click Finish to create the Web application. If you want to change any of the settings you selected, you can now access the application from the page listing applications.
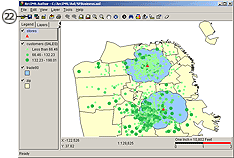
- Launch the Web Mapping Application.
- .NET version on Windows: The application should launch automatically for you to view. If not, click the URL link from the page that lists applications. Your application will open in a new browser.
- Java version on all platforms: You must deploy the application before you can view it. On the page that lists applications, check the box next to the application you want to deploy and click Deploy. Next, click View. Your application will open in a new browser.
You have successfully created a Web Mapping Application. You can continue with Exercise 4 now or return to it later.
Exercise 4: Viewing your Web Mapping Application
In this exercise, you will explore different aspects of your Web Mapping Application. The exact features in your Web mapping application may vary depending on which mapping elements you selected.
- Open your Web Mapping Application if it is not already open. You can type in the URL or you can launch the application from the list of applications in Web Manager.
- Click the Help link. If at any time you want additional information about the application, refer to this Help. After reviewing, close the Help.
- If you have a wheel mouse, zoom in on the map by moving the mouse over the map and scrolling the wheel forward a few times.
- Pan (re-center) the map a few times by clicking and dragging on the map. The pan function is the default tool, active when the application starts.
- If your application includes the navigation tool, open the panel, and click on a corner of the image (may have an arrow) to pan the map in the direction of the arrow. Hold down briefly on a corner of the image to pan more distance. Then pan back in the opposite direction. Notice the map is already present in areas you return to. This illustrates the caching functionality of the application.
- In the Toolbar, click the Identify tool. Then click in the map on a feature you are interested in. The Results section of the Task Center displays the location coordinates where you clicked. If any features are found where you clicked, you will see a plus sign next to the Location coordinates in Results (if not, no "x" appears next to the Location--try again!).
- If features are found, expand the Location in the Results window in the console by clicking its plus sign. This shows the layers where features are found. Expand a layer to explore the features found. You can right-click on a feature and choose to Zoom To the feature. When finished, you can remove a results item by right-clicking with the mouse and choosing Remove.
- Display the Map Contents by clicking its down-arrow in the console. Map Contents shows the map services and layers in your map. Expand a map and its layers nodes in the tree view to show the contents of the map.
- If enabled, click the check-box next to one or more layers to turn the layer on or off. The map will update to reflect the visibility settings in Map Contents.
- Explore other content and tools in the map.