
In this installation scenario, all available installation features are installed on one machine. This includes the Server Object Manager (SOM), Server Object Container (SOC), and the Application Developer Framework (ADF). These typical installation features are pre-selected in the setup program.
ArcGIS Server can not be installed to the same location as any other ArcGIS product.
No other ArcGIS product can be installed as the ArcGIS Server user.
If ArcGIS Server is installed on a machine, you will only be able to install another ArcGIS product in single-user mode (not in multi-user mode).
Obtain an authorization file for the machine you will be installing ArcGIS Server on.
Verify that your site meets the system requirements. For system requirement information see Step 1: Verify your system requirements.
You are required to install ArcGIS Server as root, however you will be given an opportunity during the install process to assign the files to the ArcGIS Server user. The user that you assign the files to must have full permissions to the ArcGIS Server installation directory. Group users and all others must have at least execute permissions to the ArcGIS Server installation directory.
Insert the ArcGIS Server for the Java Platform media into the appropriate drive and browse to Setup to launch the setup program.
LINUX USERS: It is recommended that you install ArcGIS Server for the Java Platform to a mounted drive. If you do not install ArcGIS Server for the Java Platform to a mounted drive, some files will be left after uninstall.
Installation location: The name of the installation directory should be in lowercase. The samples and data installed require the data path to be in lowercase.
ArcGIS Server Object Container requires an authorization file. Each machine installing this feature will require a valid authorization file. See To obtain an authorization file for more information.
If you installed ArcGIS Server Object Container, the installation will configure your machine using the authorization file you received from ESRI Customer Service.
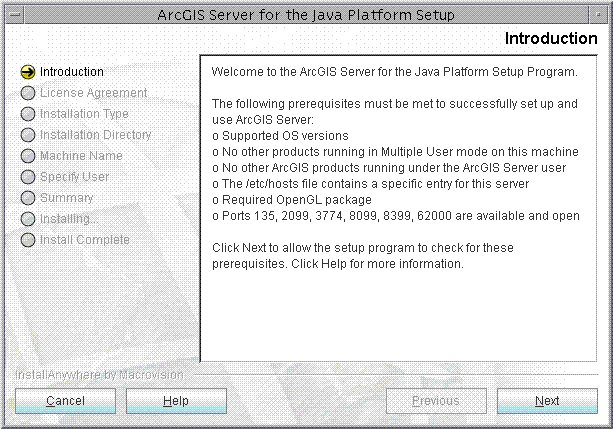
The setup program will begin by providing you with a list of prerequisites that must be met in order to successfully set up and use ArcGIS Server. Clicking Next on this Introduction dialog will allow the setup program to verify that your machine meets these prerequisites.
During the installation you will be asked to read the license agreement and accept it, or exit if you don't agree with the terms.
The ArcGIS Server install allows you to select between a Complete or a Custom installation type. The Complete installation type is the equivalent to this typical installation scenario, where all ArcGIS Server features are installed on the same machine.
The ArcGIS Server install allows you to select the features you would like to install.
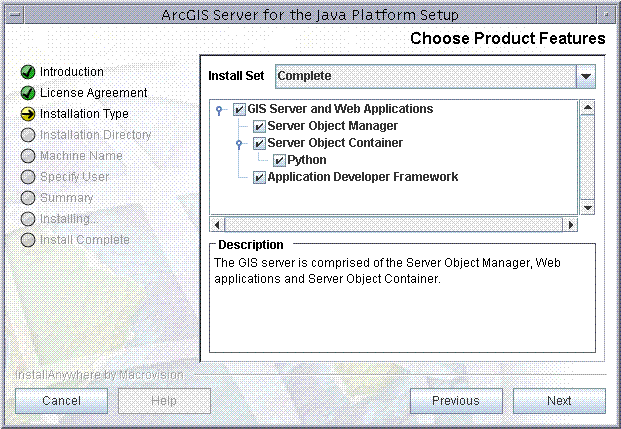
A typical installation includes all the features to be installed on one machine. For more information on these features see the Overview and ArcGIS Server site configuration topics.
Specify the installation location
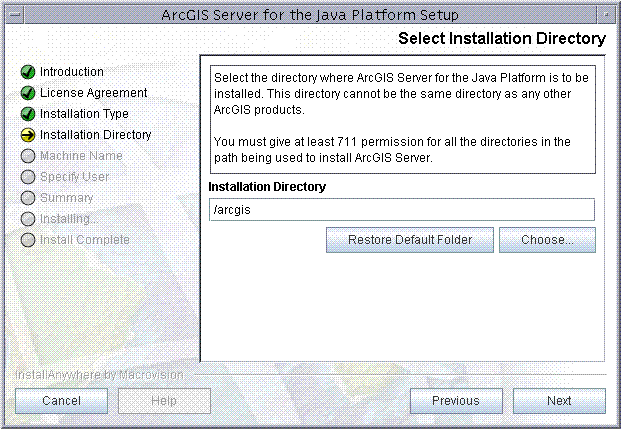
Installation location
The name of the installation directory should be in lowercase. The samples and data installed require the data path to be in lowercase.
The installation directory can not be the same as any other ArcGIS product.
At least 711 permissions are required for all directories in the path where ArcGIS Server will be installed.
Enter a fully qualified domain name
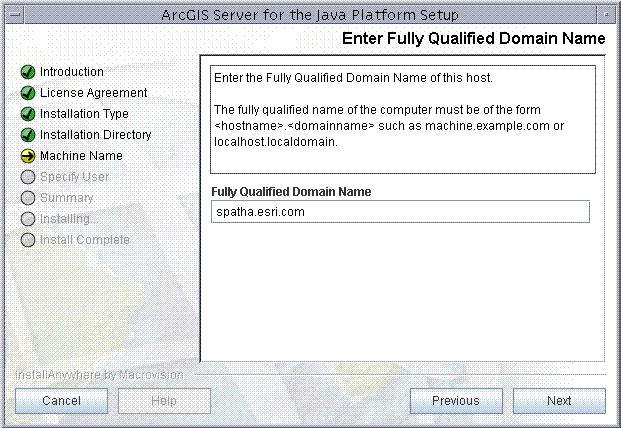
You are required to provide the fully qualified domain name of the machine you are installing on. The fully qualified domain name must be in the form of <hostname>.<domainname>.
Specify an account name

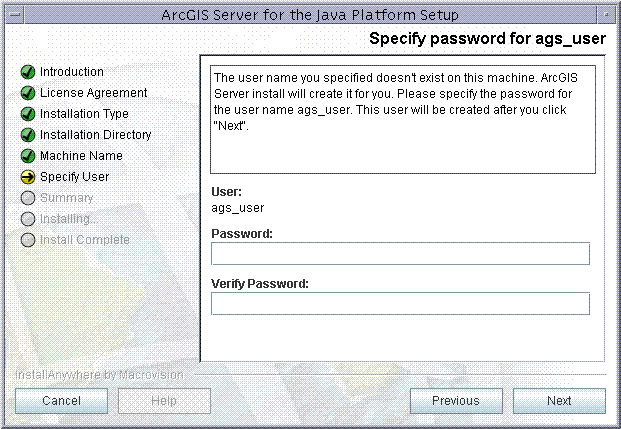
A user is required for setting file ownership, permissions and running processes. Provide the name of an account. If the user does not already exist, the setup program will create a new user for you. It is recommended that you create this user account manually first. If you manually create the user account, the user must have at least 711 permissions to access the ArcGIS Server installation location. The user name should not be longer than 8 characters.
If the user account did not already exist, you will be prompted to provide a password in order for the setup to create the user account.
All files in the ArcGIS Server installation location will be owned by this user.
To complete the installation, follow the directions on the screen.
Authorize ArcGIS Server for use.
Each ArcGIS Server Object Container machine requires an authorization file. You can obtain an authorization file using this setup program. If you have already obtained your authorization file, this setup program will configure your machine using your authorization file.
A valid authorization file is required to be able to run container processes. To re-configure your machine with an updated authorization file, launch the authorization script from <ArcGIS Server installation location>/arcgis/scripts/authorizeSoftware
To successfully configure your machine using your authorization file:
Choose your Registration option
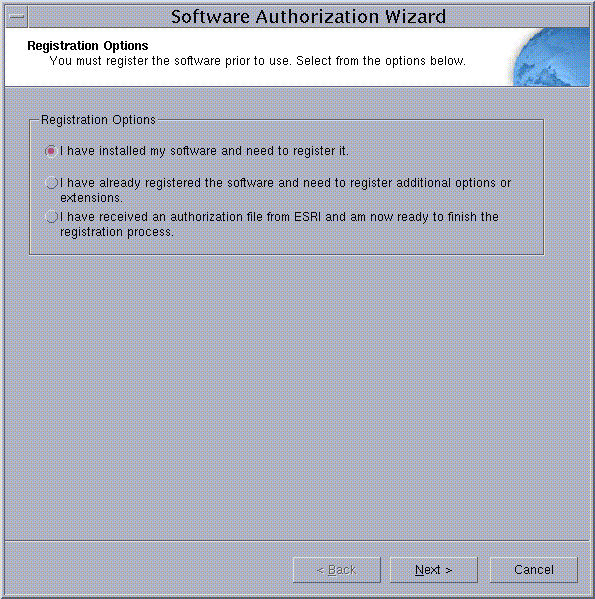
You can configure your machine using three methods:
I have installed my software and need to register it.
Select this option if you do not have an authorization file already. There are several methods to provide your registration information.

Select the registration method you would like to use. This is the method in which you will provide your registration information. After providing your registration information, your authorization file will be emailed to you.
|
Tip
|
I have already registered the software and need to register additional options or extensions.
Select this option if you have already registered ArcGIS Server for use, but you would like to register additional options or extensions (if available). There are several methods to provide your registration information.

Select the registration method you would like to use. This is the method in which you will provide your registration information. After providing your registration information, your authorization file will be emailed to you.
|
Tip
|
I have received an authorization file from ESRI and am now ready to finish the registration process.
Select this option if you have already received your authorization file from ESRI Customer Service. If you select this option you can either browse to the location of the file (if you received the file by email), or you can manually enter the authorization information.

If you chose the option to browse to an authorization file on disk, you are required to Choose or enter the location of your authorization file that you received from Customer Service.
If you chose the option to manually enter the authorization information, you are required to provide the following information: (This information can be obtained from the authorization file you received by mail, email, telephone or fax)
Feature name
Version number
Time-out date
Registration number
Authorization Code
After the installation is complete, the ArcGIS Server Manager will automatically be launched in Firefox. You will also be able to access Manager manually from any supported Web browser by navigating to http://<machine name>:8099. To access Manager for the first time, log in with the username admin and the password admin. ArcGIS Server Manager is used to manage your ArcGIS Server users. See the ArcGIS Server Manager documentation and help for more information.
ArcGIS Help System for the Java Platform is included with the ADF feature of ArcGIS Server for the Java Platform. To start ArcGIS Help System for the Java Platform, run $ARCGISHOME/scripts/startJavaHelp. To stop ArcGIS Help System for the Java Platform, run $ARCGISHOME/scripts/stopJavaHelp.
Installation notes for the Web ADF
Complete the configuration steps if you are planning to use the Web Mapping Application to configure the ADF to work with GIS services. See Installation notes for the Web ADF topic for information.
Install Notes for Enterprise Application Developer Framework (ArcGIS Server EJBs)
If you are planning to use Enterprise JavaBeans™ programming model to take advantage of ArcGIS functionality, refer to the Installation notes on ArcGIS Enterprise ADF for information.